Saturday, January 22, 2022

Top Workout Routines for Teens


Though most teens believe that the longer they workout in the gym the more bodybuilding results they will get, in reality, bodybuilding workouts should not last more than 1 hour tops with 45 minutes being an even more optimal length. The reason for this is because after 45-60 minutes of intense training, testosterone levels begin to fall and cortisol levels begin to rise. Not a good scenario for those of us who would like to build muscle and lose some body fat. Therefore, the mission is to get in and out of the gym; so that means no socializing during workout time.
Top Workout Routines for Teens


Thus, in order to maximize your results, you need to be able to hit each muscle efficiently during the allotted time, with perfect form and the right intensity. The bodybuilding workouts shown below will get you started on the right track.​​

Sample Bodybuilding Workout Routines for Teens

The bodybuilding workouts shown below will get you started on the right foot once you have gone through the beginning and intermediate phases of bodybuilding.

Workout Notes
 
Workout Frequency: You can do this workout 3 days on followed by one day off. If you need more time to recover from your workouts, you can train 2 days on and 1 day off picking up the next workout in the sequence on the following training day. Hardgainers do best by training Monday, Tuesday, Thursday, and Friday with weekends off.

Top Workout Routines for Teens


Use Perfect Form: Make sure that you use perfect form on all exercises for maximum stimulation and injury prevention. Never sacrifice form in order to add more weight.
Keep It Fast Paced: Rest 60 seconds in between sets.​​​

Workout (A): Chest/Shoulders/Triceps

Chest
Incline Bench Press (alternate with Incline Dumbbell Press every other workout) 4 sets of 12, 10, 8, 8 reps
Flat Dumbbell Press (Chest Dips every other workout) 3 sets of 10-12 reps
Incline Flyes 3 sets of 12-15 reps (alternate with Flat Flyes every other workout)

Shoulders
Dumbbell Shoulder Press (alternate with Upright Rows every other workout) 3 sets of 12, 10, 8 reps
Lateral Raises (alternate with Military Press every other workout) 3 sets of 10-12 reps
Bent Over Laterals (alternate with Rear Delt Machine) 3 sets of 12-15 reps

Triceps
Triceps Dips on Parallel Bars (alternate with Close Grip Bench Press every other workout) 4 sets of 12, 10, 8, 8 reps
Straight Bar Triceps Pushdowns (alternate with Overhead Dumbbell Triceps Extensions every other workout) 4 sets of 10-12 reps​

Workout (B): Thighs/Hamstrings/Abs

Quads
Squats (alternate with Wide Stance Squats) 4 sets of 12, 10, 8, 8 reps
Leg Press (alternate with Hack Squats) 3 sets of 10-12 reps
Leg Extensions (alternate with One Legged Leg Extensions) 3 sets of 12-15 reps

Hamstrings
Standing Leg Curls (alternate with Lying Leg Curls w/ Toes Out) 3 sets of 8-10 reps
Lying Leg Curls w/ Toes In (alternate with Seated Leg Curls) 3 sets of 8-10 reps
Lunges (alternate with Step Ups) 3 sets of 12-15 reps
(Note: Press with your heels on lunges and step ups)

Abs
Hanging Leg Raises (alternate with Knee-Ins) 4 sets of 10-15 reps
Crunches on Exercise Ball (alternate with Bicycle Crunches) 4 sets of 10-15 reps​
Workout (C): Back/Biceps/Calves

Back
Wide Grip Pull-ups to Front (alternate with Wide Grip Pull-ups to Back) 4 sets of 8-12 reps
(Note: Use Pull-up assist machine if unable to do without help)
Reverse Close Grip Chin-ups (alternate with T-Bar Rows) 3 sets of 10-12 reps
(Note: Use Pull-up assist machine if unable to do without help)
Low Pulley Rows (alternate with One Arm Rows every other workout) 3 sets of 12-15 reps

Biceps
Concentration Curls (alternate with Preacher Curls) 3 sets of 8-10 reps
Incline Curls (alternate with Incline Hammer Curls) 3 sets of 10-12 reps
Hammer Curls (alternate with High Pulley Curls) 3 sets of 12-15 reps

Calves
Standing Calf Raises (alternate with Calf Press) 4 sets of 8-10 reps
Seated Calf Raises with Toes In (alternate with Seated Calf Raises with Toes Out) 4 sets of 15-20 reps

Monday, January 3, 2022

Top 6 Boxing Basics

6 Boxing Basics That'll Make You Feel Like a Total Badass


Top 6 Boxing Basics
Share on Pinterest

Boxing may look intimidating, but it doesn’t have to feel that way. Arming yourself with a few basic moves before your first boxing class or training session will set you up for success in the ring.

“At any level, it’s always beneficial to brush up on the fundamentals,” says Tatiana Firpo, group fitness instructor at EverybodyFights.

“Plus, it’s fun! When you learn correct technique and train to understand boxing, there are endless possibilities of progress, and it’s a great feeling of accomplishment,” she says.

Before you get started, brush up on your stance and breathing technique then master the 6 basic moves below.
Top 6 Boxing Basics


Boxing stance

Start standing with feet shoulder-width apart.

If you’re right-handed, take one step back with your right foot. Left-handers, do the opposite. The lead toe should be in line with the rear heel.

Turn lead shoulder to opponent or bag. Bend knees slightly for agility.

This stagger stance helps you maintain balance. It also allows you to use your hips for power when throwing a punch.

In a real match, this stance also makes you a smaller target for your opponent, giving them less area to connect a hit. To protect your face, tuck chin and place gloves up to cheekbones.

Boxing Breath

Inhale to prepare for a punch. As you throw, exhale fast through your mouth (versus your nose) with a closed jaw. This should sound like a hiss.

In a real match, you could risk breaking the jaw if your mouth is open and you take a hit to the chin. The purpose of this sharp exhale is to engage the core and connect the punch to your body.

This breath work helps with both timing and power. Even if you’d never end up in a real fight, you’ll still look and sound like a pro.

Basic boxing moves

1. Jab

Share on Pinterest

Start in boxing stance. As fast as possible, extend front arm straight out as you step forward with front foot. Your front hand and front foot should connect simultaneously.

Pull glove back to face as fast as possible to reset. The jab, usually referred to as “1,” is your quickest punch and uses the least amount of energy.

2. Cross

Share on Pinterest

Start in a boxing stance. Step front foot forward as you rotate at the hips, pivot rear foot forward, and extend rear arm straight out. Don’t cock arm back. Also remember to keep weight evenly distributed through both legs.

Pull your fist back to face as quickly as possible to reset. The cross, usually referred to as “2” is your power punch, since you can throw your whole body into it.

3. Hook

Share on Pinterest

Start in a boxing stance. Lift your front elbow to be parallel with the floor, like you’re stirring a pot. Pivot on front foot to turn knee and roll hip over for more power. Rotate everything at the same time to connect.

Keep arm at a 90-degree bend and don’t extend through the punch. Repeat on the opposite side for rear hook. The hook — lead is “3” and rear is “4” — is a short range punch, so always keep opposite hand up to your face to guard.

4. Uppercut

Share on Pinterest

Start in boxing stance. On lead side, drop shoulder (like a side crunch) and load legs by bending at the knees slightly.

Keep your arm bent and throw a punch from the ground up as you turn your hip and pivot your foot. Don’t curl your arm. The power won’t come from biceps; it comes from the legs. Pull fist back to face as quickly as possible to reset.

Like the hook, the uppercut — lead is “5,” rear is “6” — is a short-range shot, so don’t reach for it and end up with your knuckles in the air Mortal Combat-style. Keep the opposite fist at your face for protection.

Basic defensive boxing techniques

5. Slip

Share on Pinterest

Start in boxing stance with fists up to guard. If opponent throws toward your right side, rotate from waist to left, drop left shoulder, bend knees, and crunch to left to slip outside the line of opponent’s shot.

Repeat on right side if opponent throws to left. Slipping is a defensive boxing technique and puts you in a position to counter as you rise back up to starting stance.

6. Duck

Share on Pinterest

Start in boxing stance. As opponent throws a shot (like a hook), send hips back and bend knees (like a squat), then shift your body weight from one leg to the other as you rise back up.

Like slipping, ducking is a defensive technique. Unlike slipping, you’re ducking under the shot and rising up on the other side to throw a counter.

Special thanks to Gotham Gym NYC and our model, Tatiana Firpo, for demo-ing the boxing moves.

Share...

Wednesday, September 22, 2021

Top 12 Boxing-Inspired Core Exercises for Rock-Solid Abs

You might find it surprising that boxing is one of the most complete, full-body workouts you can do. Your aerobic, anaerobic, and nervous system have to work together, and as a result, your musculature and mental sharpness, or reaction time, improves, explains Noah Neiman, cofounder and head trainer at Rumble Boxing in New York City.
 
“A common misconception most people have is that launch power for a punch comes from strong arms,” he says. “But it’s actually the ability to generate power from your legs, from the speed and power of rotation through your hips and core, and then ultimately the extension of your arms that creates a strong punch.”

Translation: Core strength is integral to generating the force necessary for boxing (whether you’re a casual kickboxer or a serious competitor). And a strong core isn’t just beneficial in the ring; it’s important outside of it too. “Poor core strength can lead to back, lower back, neck, and even knee pain,” Neiman says. So to keep you in top shape on and off the ropes, we collected 12 abs exercises borrowed from boxers that’ll help you build serious core strength.

How to use this list: Start by performing each exercise below for 30 seconds. Use the modifications or progressions listed, if applicable, to better suit your personal strength. Build up to 60 seconds each. Perform each move with no rest in between for a killer 12-minute workout or scroll down to try our 12-minute, 4-move sample workout below. You can substitute any exercise in this list for another in the workout. Grab an exercise mat to get started.

Inchworm Push-Up

Share on Pinterest

Stand with feet shoulder-width apart. Hinge at hips to bend over and touch floor with hands, then walk hands out to high plank position. Keeping elbows close to sides, bend elbows and lower chest to floor. Push back up, then walk hands back toward feet. Repeat. Make it easier: Drop to knees for the push-up then return to plank.

Sit-Up With One-Two Punch

Share on Pinterest

Lie faceup on mat, knees bent, feet flat on the floor in front of you. Keeping feet planted, engage core and use abdominal muscles to sit up while keeping hands in fists in guard in front of face. At the top, throw a right and left punch, then slowly lower back down one vertebrae at a time to return to starting position. Repeat. Make it harder: Add 16-ounce gloves or a light set of hand weights.

Walking Plank

Share on Pinterest

Start in high plank position, hands directly under shoulders, legs extended out behind you, core engaged to keep body in straight line from head to toe. Lift up right hand and lower right forearm to the floor. Do the same with left hand and forearm. Then lift right forearm and place right hand back on ground, followed by the left hand. Continue repeating. Make it harder: Place a BOSU ball underneath your forearms to challenge your stability.

V-Up

Share on Pinterest

Lie faceup on mat, legs extended straight, arms extended overhead. Keeping core engaged, sit up, lifting arms and legs simultaneously toward each other, so body forms a V shape. Slowly lower back down until arms and legs are two inches above ground. Repeat.

Plank Jack

Share on Pinterest

Start in a forearm plank, elbows directly under shoulders, core engaged so body forms a straight line from head to toe. Without moving upper body, jump feet apart, then back together. Continue jumping.Make it harder: Increase your speed.

Sprinter Crunch

Share on Pinterest

Lie faceup on mat, legs extended out in front of you, hands up in guard. Keeping core tight, sit up and twist toward left while simultaneously bringing left knee to right elbow. Lower back down to starting position. Repeat on other side. Continue alternating.

Straight Leg Scissor

Share on Pinterest

Sit on mat, legs extended straight out in front of you. Lean torso back and place fingertips on floor next to hips for support. Keeping legs straight NS core engaged, lift right leg toward ceiling. Lower, then lift left leg toward ceiling. Continue alternating. Make it harder: Add ankle weights.

Push-Up to Superman

Share on Pinterest

Start in high plank position, hands slightly wider than shoulder-width apart, body in straight line from head to toe. Bend at elbows to lower chest to floor to perform a push-up. Release hands, pull shoulder blades together, and lift chest, arms, and legs off mat. Lower down, place hands on ground, and push back up to plank position. Repeat.

Russian Twist
 
Share on Pinterest

Sit on mat with knees bent, feet on floor in front of you about hip-width apart. Engage core, lean back about 45 degrees, and bring fists up to chest with elbows out. Twist at waist to tap right elbow to the mat on right side, then left elbow to mat on left side. Continue alternating. Make it harder: Grab a medicine ball or kettlebell in the weight of your choice and hold at chest.

Shoulder Tap

Share on Pinterest

Start in high plank position, hands directly under shoulders, body in straight line from head to toe. Without shifting weight and keeping body still, lift right hand and tap left shoulder, then lift left hand and tap right shoulder. Continue alternating as fast as possible.

Reverse Oblique Crunch

Share on Pinterest

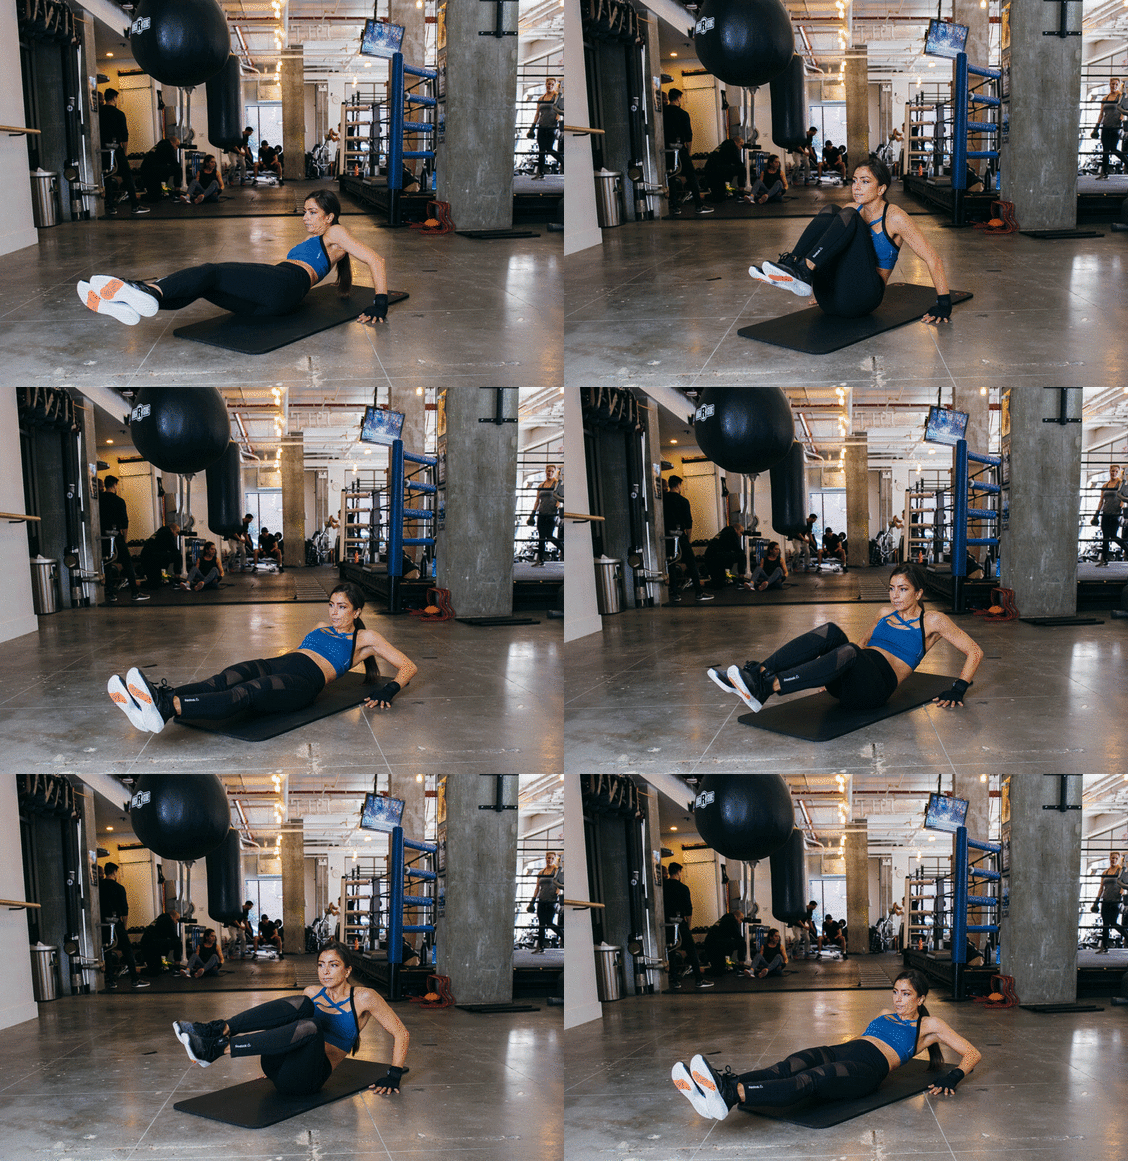
Start sitting on mat, legs extended out in front of you, hands on mat behind you. Lean back slightly onto fingertips for balance and lift legs two inches off floor. Keeping core tight, twist at the waist and bring bent knees toward chest, then extend back out (don’t drop legs to mat). Twist to the other side and repeat. Continue alternating.

Sit-Up to Stand Up

Share on Pinterest

EDITOR’S PICK{{displayTitle}}This is a classic Mayweather move that’ll challenge your entire body. Grab a partner (or just use the base of a couch, dresser, or heavy object to lock down your feet). Start lying faceup on mat, knees bent, feet flat on the floor in front of you with partner anchoring feet. Engage core, perform a sit-up, and continue to come all the way up to standing, reaching arms overhead. Slowly reverse the movement back down to return to starting position. Repeat. Make it harder: Add a set of dumbbells.
 
Share on Pinterest
Photography: Julia Hembree

Special thanks to Gotham Gym NYC and our model, Tatiana Firpo, Gotham group fitness manager and trainer.