Showing posts with label Fun. Show all posts

Saturday, July 18, 2026

One Push on a Cliff: What This Viral Ibex Moment Teaches Us About Survival in the Wild

One Push on a Cliff: What This Viral Ibex Moment Teaches Us About Survival in the Wild

A dramatic wildlife video showing one ibex apparently pushing another on a narrow cliff ledge has gone viral across social media. The breathtaking footage has sparked debate among viewers: Was it an act of aggression, self-defense, or simply part of the harsh realities of life in the mountains?

The video captures two wild ibex standing on a steep rocky ledge high above the ground. As the animal in front carefully balances near the edge, the ibex behind appears to push it forward. The unexpected moment quickly grabbed millions of viewers’ attention, with many comparing it to human social behavior and survival instincts.

Ibex are mountain-dwelling wild goats famous for their incredible climbing ability and balance. They inhabit steep cliffs where space is limited and footing is critical. Dominance disputes, territorial behavior, competition for position, or accidental contact can all occur in these environments.

While the footage appears dramatic, a short clip alone cannot reveal the full context or the animals’ intentions. Wildlife experts generally caution against assigning human motives to animal behavior without additional evidence. What looks like a deliberate act may have been part of normal interaction between the animals.

Nature operates under its own rules. There are no referees, second chances, or safety barriers on a mountain cliff. Every step requires precision, and every decision carries consequences.

This viral moment reminds us that survival in the wild depends on instinct, awareness, and adaptation. It also serves as a reminder not to rush to conclusions based on a brief video clip. Observing wildlife is fascinating, but understanding it requires patience and respect for the complexity of animal behavior.

Whether this was an intentional push or simply a misunderstood interaction, one thing is certain—the mountains are among nature’s toughest environments. The video has inspired conversations about survival, instinct, and the incredible abilities of animals that thrive where few others can.


Mention:

📹 Credit to the original owner of the footage.
📝 Article by HaveFunKeepFit | Coach Noel

#Wildlife #Ibex #MountainLife #Nature #AnimalBehavior #Survival #WildGoats #NaturePhotography #WildlifeVideo #ViralNature #UnexpectedPush #CliffLedge #HaveFunKeepFit #CoachNoel #Blogging

👉 Follow HaveFunKeepFit | Coach Noel for more inspiring wildlife stories, educational articles, viral news, and engaging content.

Comment:

💬 What do you think happened in this video? Was it instinct, competition for space, or something else? Share your thoughts in the comments below—but remember that a short clip may not tell the whole story.


Wednesday, September 22, 2021

Top 12 Boxing-Inspired Core Exercises for Rock-Solid Abs

You might find it surprising that boxing is one of the most complete, full-body workouts you can do. Your aerobic, anaerobic, and nervous system have to work together, and as a result, your musculature and mental sharpness, or reaction time, improves, explains Noah Neiman, cofounder and head trainer at Rumble Boxing in New York City.
 
“A common misconception most people have is that launch power for a punch comes from strong arms,” he says. “But it’s actually the ability to generate power from your legs, from the speed and power of rotation through your hips and core, and then ultimately the extension of your arms that creates a strong punch.”

Translation: Core strength is integral to generating the force necessary for boxing (whether you’re a casual kickboxer or a serious competitor). And a strong core isn’t just beneficial in the ring; it’s important outside of it too. “Poor core strength can lead to back, lower back, neck, and even knee pain,” Neiman says. So to keep you in top shape on and off the ropes, we collected 12 abs exercises borrowed from boxers that’ll help you build serious core strength.

How to use this list: Start by performing each exercise below for 30 seconds. Use the modifications or progressions listed, if applicable, to better suit your personal strength. Build up to 60 seconds each. Perform each move with no rest in between for a killer 12-minute workout or scroll down to try our 12-minute, 4-move sample workout below. You can substitute any exercise in this list for another in the workout. Grab an exercise mat to get started.

Inchworm Push-Up

Share on Pinterest

Stand with feet shoulder-width apart. Hinge at hips to bend over and touch floor with hands, then walk hands out to high plank position. Keeping elbows close to sides, bend elbows and lower chest to floor. Push back up, then walk hands back toward feet. Repeat. Make it easier: Drop to knees for the push-up then return to plank.

Sit-Up With One-Two Punch

Share on Pinterest

Lie faceup on mat, knees bent, feet flat on the floor in front of you. Keeping feet planted, engage core and use abdominal muscles to sit up while keeping hands in fists in guard in front of face. At the top, throw a right and left punch, then slowly lower back down one vertebrae at a time to return to starting position. Repeat. Make it harder: Add 16-ounce gloves or a light set of hand weights.

Walking Plank

Share on Pinterest

Start in high plank position, hands directly under shoulders, legs extended out behind you, core engaged to keep body in straight line from head to toe. Lift up right hand and lower right forearm to the floor. Do the same with left hand and forearm. Then lift right forearm and place right hand back on ground, followed by the left hand. Continue repeating. Make it harder: Place a BOSU ball underneath your forearms to challenge your stability.

V-Up

Share on Pinterest

Lie faceup on mat, legs extended straight, arms extended overhead. Keeping core engaged, sit up, lifting arms and legs simultaneously toward each other, so body forms a V shape. Slowly lower back down until arms and legs are two inches above ground. Repeat.

Plank Jack

Share on Pinterest

Start in a forearm plank, elbows directly under shoulders, core engaged so body forms a straight line from head to toe. Without moving upper body, jump feet apart, then back together. Continue jumping.Make it harder: Increase your speed.

Sprinter Crunch

Share on Pinterest

Lie faceup on mat, legs extended out in front of you, hands up in guard. Keeping core tight, sit up and twist toward left while simultaneously bringing left knee to right elbow. Lower back down to starting position. Repeat on other side. Continue alternating.

Straight Leg Scissor

Share on Pinterest

Sit on mat, legs extended straight out in front of you. Lean torso back and place fingertips on floor next to hips for support. Keeping legs straight NS core engaged, lift right leg toward ceiling. Lower, then lift left leg toward ceiling. Continue alternating. Make it harder: Add ankle weights.

Push-Up to Superman

Share on Pinterest

Start in high plank position, hands slightly wider than shoulder-width apart, body in straight line from head to toe. Bend at elbows to lower chest to floor to perform a push-up. Release hands, pull shoulder blades together, and lift chest, arms, and legs off mat. Lower down, place hands on ground, and push back up to plank position. Repeat.

Russian Twist
 
Share on Pinterest

Sit on mat with knees bent, feet on floor in front of you about hip-width apart. Engage core, lean back about 45 degrees, and bring fists up to chest with elbows out. Twist at waist to tap right elbow to the mat on right side, then left elbow to mat on left side. Continue alternating. Make it harder: Grab a medicine ball or kettlebell in the weight of your choice and hold at chest.

Shoulder Tap

Share on Pinterest

Start in high plank position, hands directly under shoulders, body in straight line from head to toe. Without shifting weight and keeping body still, lift right hand and tap left shoulder, then lift left hand and tap right shoulder. Continue alternating as fast as possible.

Reverse Oblique Crunch

Share on Pinterest

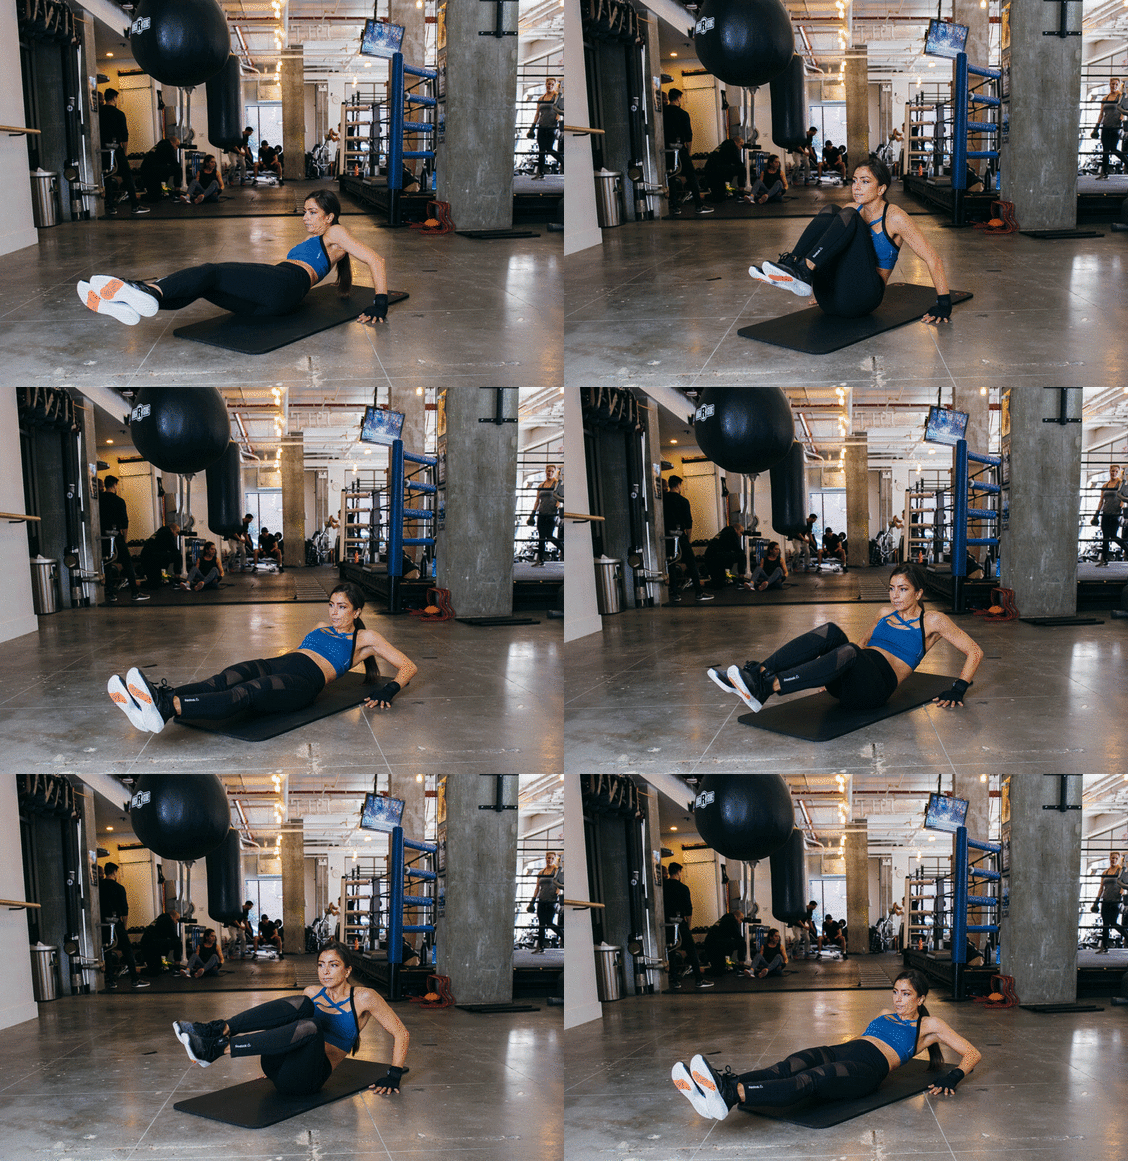
Start sitting on mat, legs extended out in front of you, hands on mat behind you. Lean back slightly onto fingertips for balance and lift legs two inches off floor. Keeping core tight, twist at the waist and bring bent knees toward chest, then extend back out (don’t drop legs to mat). Twist to the other side and repeat. Continue alternating.

Sit-Up to Stand Up

Share on Pinterest

EDITOR’S PICK{{displayTitle}}This is a classic Mayweather move that’ll challenge your entire body. Grab a partner (or just use the base of a couch, dresser, or heavy object to lock down your feet). Start lying faceup on mat, knees bent, feet flat on the floor in front of you with partner anchoring feet. Engage core, perform a sit-up, and continue to come all the way up to standing, reaching arms overhead. Slowly reverse the movement back down to return to starting position. Repeat. Make it harder: Add a set of dumbbells.
 
Share on Pinterest
Photography: Julia Hembree

Special thanks to Gotham Gym NYC and our model, Tatiana Firpo, Gotham group fitness manager and trainer.

Saturday, July 10, 2021

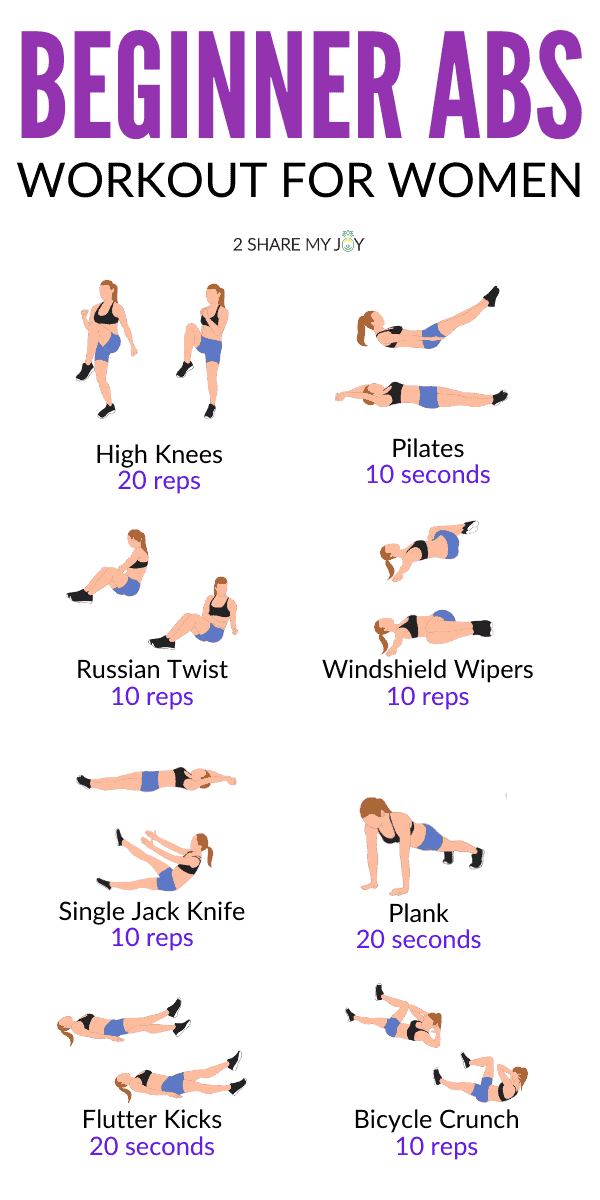
Top Ten Minutes Abs Workout For Women


Make sure to take a 30 second break between each ab exercise!

#1 WARM UP: HIGH KNEES (20 REPS, 10 EACH SIDE)

Place your feet hip width apart. Lift your right knee towards your chest then switch knees with a light hop. Move your arms along the side of your body for balance (see picture).


#2 PILATES (HOLD FOR 10 SECONDS)

Lay on your back and lift your shoulders off the floor while placing your hands next to your hip. Lift your feet up and hold.

Make sure your back touches the floor. If your back bows, raise your legs higher for a rounder back. Keep your legs straight.


#3 RUSSIAN TWIST (10 REPS, 5 EACH SIDE)

Sit on the floor in a V position keeping your knees bent. Move your fists together in front of your belly, then move them together hip to hip.

Try to move them as far to the side and down next to your hip as possible. If this is too easy, lean back further.


#4 WINDSHIELD WIPERS (10 REPS, 5 EACH SIDE)

Lie on your back and stretch your arms in a 90 degree angle away from your body. Pull in your legs by making a 90 degree angle with your legs.

Then rock them side to side like a windshield wiper making sure not to lift the shoulders off the floor.


#5 SINGLE LEG JACK KNIFE (10 REPS, 5 EACH SIDE)

Lie on your back and stretch your arms above your head. Then lift one leg up and reach your hands toward your foot at the same time.

Make sure legs and arms stay straight and your upper body is completely lifted off the floor. Slowly lower your body back down to the starting position then switch legs.


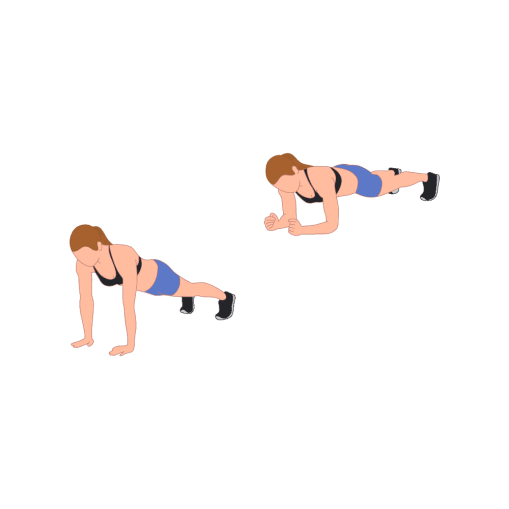
#6 PLANK (20 SECONDS)

Start on your toes and hands or elbows and keep your body straight like a board. Your feet can be hip width apart and your hands or elbows shoulder width.

Hold this position. Make sure your hips don’t drop too low or rise too high.


#7 FLUTTER KICKS (20 SECONDS OR 20 REPS, 10 EACH SIDE)

Lie on your back and place your arms next to your body (straight). Lift both legs and keep them straight while moving them up and down the opposite way.

If there is a gap between the floor and your back, raise your upper body to round out your back. You can then lean on your elbow and place them next to your body to help hold up the weight.


#8 BICYCLE CRUNCH (10 REPS, 5 EACH SIDE)

Lie on the floor and place your hand behind your head. Open up your elbows and move the left elbow towards the right knee while twisting your core. Lift the leg in a 90 degree angle towards your elbow.


Move back into the starting position then switch sides. Don’t pull on your head and be sure to keep your elbows open. You are not supposed to see your elbow in front of you.

Monday, March 15, 2021

German Volume Training Method

This method has been reported to be the most productive workout tried. It’s hard, but effective to build muscle fast! The method is called The German Volume Training or The Ten Sets Method.


This works by targeting a group of motor units, using extensive volume of repeated efforts including 10 sets of a single exercise.

The body adapts to the stress by hypertrophying the targeted fibres. With this program you can add muscle fast, even gains of 10 pounds or more in six weeks can be achieved.

Guidelines

German Volume Training method is designed to complete ten sets of ten reps with the same weight for each exercise. Beginning with a weight you could lift for 20 reps to failure.

For most people this would represent 60% of their 1RM load. For example: If you bench press 300 pounds for 1 rep, you would use 180 pounds for this exercise.

I recommend using the following body part splits:
Day 1: Chest & Back
Day 2: Legs & Abs
Day 3: Off
Day 4: Arms & Shoulders
Day 5: Off
 

Terminology understanding

Rest Intervals: Often questioned for the first several sets as the weight won’t feel heavy enough. But, there is minimal rest between each set, around 60 seconds when used in sequence and 90-120 seconds when used as a superset, this causes cumulative fatigue. Because of the importance of the rest intervals, you should time to keep the rest intervals constant.

Tempo: When using movements such as squats, dips and chins, use a 4-0-2 tempo. This means you lower the weight in four seconds, immediately change direction and lift for two seconds. For movements like curls and triceps extensions, use a 3-0-2 tempo.

Number of Exercises: One exercise per body part should be performed. Select exercises that recruit a lot of muscle mass. Triceps, kickbacks and leg extensions are out, squats and bench press are in. For individual body parts, you can do 3 sets of 10-20 reps.


Training Frequency: Because this is such an intense program, it takes longer recovery time. The average “Power Factor Rating” of the 10 sets method is a lot. One training session every four to five days per body part is plenty.

Overload Mechanism: When you’re able to do 10 sets of 10 with constant rest intervals, increase the weight on the bar by 4-to-5% and repeat the process. Refrain from using forced reps, negatives or burns. Expect to have deep muscle soreness without having set prolonging techniques.


You should perform the phase 1 program for six splits (six 5-day cycles= 30 days), then, three weeks with a lower volume program using 6 to 8 reps, allowing your body to recover and then start phase 2.

Phase 1
 
Day: 1

Exercise Sets Reps Tempo Rest
A1 Flat DB Presses 10 10 4020 90
A2 Supinated Chin-ups 10 10 4020 90
B1 Incline Flies 3 10-12 2020 75
B2 Cable rows to neck 3 10-12 2020 75

Day: 2

Exercise Sets Reps Tempo Rest
A1 Back Squats 10 10 40X0 90
A2 Lying Leg curls feet outward 10 8 40X0 90
B1 Low Cable Pull-ins 3 10 2020 75
B2 Seated Calf Raise 3 10-12 2020 75

Day 3: Off (Rest)

Day: 4

Exercise Sets Reps Tempo Rest
A1 Close grip bench press 10 10 40X0 90
A2 Incline DB Curls 10 10 40X0 90
B1 Seated Lateral Raises 3 10-12 2011 75
B2 Reverse Curls 3 10-12 40X0 75

Day 5: Off (Rest)
 

Phase 2:

After completing six 5 day cycles of the phase 1 program, choose a three week program using 6 to 8 reps per sets for 4 to 6 sets total per body part.

You can still use the same 5 day cycle or you can use another split that suits your recovery pattern.

After this 3 week block, you continue for phase 2 of the German Volume Training method, with the following changes:

Do ten sets of six reps per exercise instead of 10 sets of 10 reps. Use a load you can usually do 12 repetitions with. The aim in this phase is to do ten sets of six with that load.

Day 1:

Exercise Sets Reps Tempo Rest
A1 Incline Barbell Press 10 6 5010 120
A2 Wide grip pull-ups 10 6 5010 120
B1 Decline Flyes 3 8-10 2020 75
B2 Incline Sit ups 3 8-10 2020 75

Day 2:

Exercise Sets Reps Tempo Rest
A1 Front Squat 10 6 31X0 120
A2 Lying Leg Curls feet inward 10 6 30X0 120
B1 Back Extensions 3 8-10 2012 75
B2 Standing Calf Raise 3 8-10 22X0 75

Day 3: Off (Rest)
 
Day 4:

Exercise Sets Reps Tempo Rest
A1 Dips 10 6 31X0 100
A2 Hammer Curls 10 6 30X0 100
B1 Bent Over Lateral Raise 3 8-10 2-0-1-2 75
B2 Wrist Curls 3 10-12 2020 75

Day 5: Off (Rest)


Share...

Sunday, March 7, 2021

Top Bodyweight Exercise To Start Right Now

Best Bodyweight Exercises To Start Building A Lean, Strong Physique Right Now


One of the best things I learned about over the years looking into physical fitness is the idea of bodyweight exercises.

They are a great way to stay in shape if you’re already exercising regularly but can’t get to a gym. But they are also great to incorporate into your regular regimen.

Also, bodyweight exercises are fantastic for beginners just starting to get into exercising routines. They are a great way to learn about technique. You can start resistance training without the need for any equipment.

If you are limited in where you can find weights or machines that you think you might need for your workout, well worry no more.

As I alluded to already, you can do bodyweight exercises virtually anywhere… home, gym, outside…you’re only limited by your own creativity.

One of the most important things to keep in mind while performing these exercises is technique. You want to get the most out of them. You don’t want to spoil their effectiveness by not doing them properly.

If you’re just starting out with exercising, stick with a regular regimen of bodyweight exercises and you will progress quickly.

These are the kinds of routines I did when I was playing sports regularly. They’ll improve your strength and endurance fast.

I still incorporate lots of them in my routine today.

Eventually, you’ll graduate into more complex workouts. I guarantee that bodyweight exercises will be a regular part of those routines.

Sounds Good But How Long Can I Do Bodyweight Exercises?

There is something you will probably wonder about as you get stronger and more fit. It’s whether you can actually progress that far with bodyweight exercises. You’ll probably also worry about plateauing quickly.

After all, you might be thinking, hey, I’m going to be lean and getting stronger. How long could these bodyweight exercises actually benefit me?

When you start feeling that way about your routine or start getting bored, there’s something you have to keep in mind. It’s something that people tend to forget about with these kinds of routines.

It’s the concept of progressive overload.
Image by skeeze from Pixabay

This principle ensures you continue to challenge your muscles and your body will respond in kind. You increase the level of difficulty and you will see the difference in your body.

Without progressive overload your body will not change much after a certain point.

However, if you are content with the level of physical fitness you attained with your regimen of bodyweight exercises and do not want to progress further, you can simply maintain what you achieved by repeating the same routine or similar variations of it.

Be happy. That’s what I say.

Simple enough right? But I’m guessing you’ll want to keep moving forward.
Doesn’t It Get Boring?

I’d also suggest trying to mix it up a little just so you don’t get bored.

So whether you’re thinking about doing bodyweight exercises for strength, burning calories, for arms, for legs, for back, for toning or for whatever…

Whew…

Here is a list of body weight exercises that are easy to do and sure to get you on track for that lean, strong body you want… Oh, and this should keep it exciting.

1. Push Ups – The Granddaddy Of Body Weight Exercises

Without question push ups are my favorite body weight exercise. Even if you haven’t tried to do even one yet, if you’re serious about getting into shape this is one exercise you want in your arsenal.

It will help you develop upper body strength. Even if you can’t do one normally, there are easier variations to get you started.

Once you have the technique down, you can work on the repetitions. Once, your numbers are up and it’s coming easy for you, there are variations you can try to make it harder.

It is such a great movement. It strengthens and tones so many parts of your body. It’s great for your chest, shoulders, upper back and your core. You can even activate your glutes for a solid frame to push up from.

Here’s a couple guys from over at dynamicsofmotion.com using pretty good form for the standard push up. They cover all the bases and this is a good place to start from for this exercise.

You can make it a little easier

Now if you’re just starting out and this form is too difficult for you, there are easier ways to do it.

First, instead of being up on your toes, you can do it from your knees. This will make it much easier and help you to begin to develop that upper body strength.

However, one of the great benefits of the push up is the development of core strength. If you do this move from your knees, you’re not doing much for your core.

I’d suggest a couple other variations. You can do it standing up a couple feet from a wall. Put your arms straight out and hands flat against the wall. Then do the push up against the wall, keeping your feet in place.

An even better beginner version is simply getting something to elevate your hands. An easy idea is a chair. Make sure it is sturdy and won’t move. Put your hands flat against the seat, stretch your legs out straight behind you and go for it.

You’ll find these easier than the standard position and still activating most of the muscles you want to develop and tone.
How about a challenge?

If you want to make it more difficult, there are a couple variations. As you push up, try and launch your hands off the floor. Just make sure you’re doing it on a cushioned surface so you don’t injure your wrists.

Or, for a different kind of challenge. Instead of flat across the floor, elevate your feet behind you. You can put them up on a chair or a step. You will definitely feel that and it attacks the chest at a slightly different angle.

2. The Squat

From the upper body we move to the legs and glutes with the squat.

This is a great compound movement that really benefits the body in a number of ways.

I found it helped me to build my leg strength as well as balance and coordination.

You’ve probably seen this one performed by big muscular guys with a bar across their shoulders and a ton of weight on each side.

That is definitely something you want to build up to and not attempt at your first go with this exercise.

Also, you don’t have to worry about the bar if you’re not going for massive legs and weight.

Here’s the great news. You can develop your legs and strength with this move, simply by using your body weight.

Here’s a great demonstration by Anna Renderer of proper form on the squat:

An added bonus that Anna over at Popsugar gives you is a tip for building back and glute strength if you are having trouble with the basic squat. Really helpful tips. She really breaks it down well.

I never used to enjoy doing squats. Always thought of them as an inconvenience. But it’s so important to take care of your legs and lower body.

Those are big muscle groups down there and really important as the foundation of so many other movements that your body makes. So don’t neglect your legs.

A little regression tip

If you are wrestling with the basic squat and working on building your strength, here’s an idea.

Do the squat into a chair. Only go down as far as the seat of the chair and then come back up. As you get stronger, you’ll be able to do the full squat and won’t need the chair.

… Or maybe a little tougher

If you are looking for more of a challenge with this movement, try this:

Go down on one knee. Hold on to the edge of a table or door for balance only. Do not use it for leverage.

Now push up with the one foot on the floor, keeping your other knee bent. This is a kind of single leg squat and you will really feel the burn with this one. If you can do it without holding on to anything, even better.

If that’s still too easy for you, throw on a weighted vest or hold a dumbell while doing the squat.

Just don’t go for these advanced variations until you’ve got proper form for the squat. But when you do, you’ll be developing some strong, toned legs.

3. The Plank

Most people like it, some aren’t crazy about it but I found it does the trick for me.

The plank is great for your core and there are sooooo many variations you can try to bring in other parts of your body.

I incorporate it into my warm up and I enjoy doing it with a couple variations on its own as part of an abdominal workout day.

Here’s a good demonstration by Scott over at Scotthermanfitness.com of how to use proper form with the plank. He provides a good demo with all the helpful tips you’ll need to execute this move correctly.

Now here’s the thing with the plank. It’s a good burn in the beginning and you’ll definitely feel it.

Start doing it for 30 seconds to a minute. Eventually you’ll get really good at that and may want to simply try holding it for longer.

Try changing it up

I would suggest changing it up to get even more out of the movement. For example, from the standard position, reach straight out with your arm hold it, then switch to the other arm. Go back and forth and see what that does.

Also, try doing it from a fully extended push up position. Instead of doing it on your forearms do it on the palms of your hands. Try alternating reaching out with your hands again.

Another great variation I enjoy from the push up position is alternating bringing your knees up to your elbows. You can do it straight forward, right knee to right elbow or even more challenging, across your midsection, right to left, alternating back and forth. See how that feels.

Celebrity fitness trainer Harley Pasternak is a big fan of bodyweight exercises. One variation that he really likes is the Pike Plank.

How about for strength in your back

An additional variation to bring into play your posterior chain is the reverse plank.

This is a really good one. Some might argue, even better than the original.

With the reverse you lie on your back. Legs together and straight out. Then extend your arms out on both sides with your palms up. Pressing from your upper back and heels, lift your hips off the floor. And hold. See how that feels. Great for the posterior chain.

Do it for intervals just like the regular plank. I really like this variation as well. Make sure to have some music going so you don’t have to listen to yourself breathing.

4. The Mule Kick

If you’re looking for a full body workout that will tone and condition your body, look no further than the mule kick.

This is one that will definitely get your heart rate going and build up a good sweat.

Here’s a pretty good demo of proper form for the mule kick brought to you by the folks over at Beachbody. I apologize in advance for the music. You might want to turn down your volume.

Did you turn the volume off completely? That’s what I thought.

So a couple quick points. This is not to be confused with the single leg mule kick done one at time as a lift to work your glutes.

This is the full body, real mofo and trust me when you start doing it, you’ll see what I mean.

The variation that I prefer is keeping the legs together on the up kick but do what feels best for you. Even better, alternate from one to the other and see how it goes.

Another slightly easier version involves less of a kick. Instead of kicking up and out, just kick up keeping your knees bent and tap your butt with your heels.

In the beginning I’m guessing you’ll hate this one. But it just might grow on you. Great for a day when you are working your shoulders. You’ll see what I mean.

5. The Pull Up – A Must Have Bodyweight Exercise

This would probably be considered another granddaddy of bodyweight exercises. But I’ve already used that adjective so I’ll just say this is a big one.

Up until now you didn’t need anything other than your own body to perform the bodyweight exercises I’ve highlighted.

Granted, that may mean this is not as pure a bodyweight exercise but it still is so let’s just let that go.

So you’re going to have to grab onto something to do this one. I highly recommend a bar.

Some people might try a tree branch or ledge. But I’d still recommend a bar.

Although, hanging rings are great for this as well.

If you don’t have a bar you can get one from a sporting goods store. It’ll be affordable. Get one with the multi-directional grips. Totally worth it.

Here’s a great demo of proper technique for the pull up brought to you by the folks at Calisthenicmovement. This is one of the most thorough tutorials ever. They do a great job of covering all the variations of this amazing bodyweight exercise.

Quite a bit of info. in that demo. Lots of good stuff.

I’m a big fan of the arched back with scapular contraction because this really activates your back muscles. It also puts less strain on your shoulders.

You’re going to be doing lots of these over time and technique will be important in the long run to prevent injury and allow you to continue to do the movement for many years to come.

I also heard to put even less stress on your shoulders over time, use the alternative grip with your palms facing inwards. When you look at the multi-directional grip bar you’ll see what I mean.

Now if you haven’t done pull ups before you may be looking at this exercise and think… You’ve Got To Be Kidding! It can be a little overwhelming at first.

A great beginner’s variation to build muscle and strength

So here is what you do to get started.

Try a reverse pull up. This is where you put something under the bar so that you can get yourself up to the top position. Try a step stool or a chair. Give yourself enough room underneath so you can come down without hitting whatever you are using.

Alternatively, if you can grip the bar from a standing position, just jump up from the starting position and try to hold yourself for a second at the top.

However you get to the top position to start, simply lower yourself down slowly. This will help you to develop the grip and back strength to eventually do a proper pull up.

If you’re going to a gym, find the lat pull down machine. Doing sets with this type of machine will help you develop the strength needed to perform a proper pull up.

There you have it. These are some of the best bodyweight exercises out there. Fun to do and guaranteed to tone and strengthen your body if you stick with them.

There are sooooooo many more out there but these 5 are at the top of my list. I will probably do another post at some time if there is interest in others or if you want to know about more variations of the ones I mentioned.

These are great and really enjoyable to integrate into your bodyweight workout plan. Give them a shot and let me know what you think.


Also, if you’ve got others you’d like to share, I’d like to hear about them.

Tuesday, February 16, 2021

Boxer’s Partner Workout

Duke it out with a friend for this shadowbox and squat combo Piela created. He also mixes in strength moves to sculpt strong arms, abs and even legs.


Photo: Ryan Kelly / Daily Burn 365

3-minute warm-up:
30 sec jog in place
1 min jumping jacks
30 sec mountain climbers
1 min jump rope

Partner push-ups: Hold a high plank position facing your partner — you should be head-to-head. Each of you perform a push-up and when you reach the top of your plank, slap hands. (Alternate hand slaps after each push-up.) Do three sets of 10 to 15 reps.

Partner sit-ups: Lie on your backs, facing toward each other with feet flat on the floor and toes touching. As you come up to perform a sit-up, slap hands. Do three sets of 15 to 20 reps.

Jab-cross and squat combo: One partner continuously performs jabs and crosses, with a pause between each combo. The other partner simultaneously squats down, so as to dodge the punches. Continue for two minutes, then switch.

Partner leg lifts: One partner stands with feet hip-width apart, while the other lays down on her back (legs out straight) and holds onto the other person’s ankles. The partner on the ground lifts her legs straight up in the air (avoid bending the knees), as the standing partner pushes the feet back down toward the ground. The partner on the ground should tuck the pelvis upward, pushing the lower back onto the mat. Perform three sets of 12 to 15 reps, alternating partner positions.

Glove-to-glove punches: Stand facing your partner. Keep your hands up at your face as each person performs jabs, crosses and hooks with the same hand, so they hit each other. (If you don’t have gloves, step farther apart to avoid contact.) Make sure to turn shoulders and hips with each punch and to engage the abs the entire time. Repeat for one minute. Up the challenge by using hand weights (sans gloves).


SHARE...

Boxer’s Strength Workout

Feel the burn from head to toe with these toning moves that Piela put together. You’ll use boxing as the warm-up to fire up your core muscles and get your heart pumping.


Photo: Ryan Kelly / Daily Burn 365

2-minute warm-up: Do one minute of a jab-cross combo as fast as you can. Immediately follow that with one minute of right and left uppercuts, as fast as you can.

Lying hip raises: Lie on your back with knees bent and feet flat on the floor. Lift your hips, creating a straight diagonal line from knees to shoulders. Straighten one leg, holding it just above the floor. Then lift it straight up, about 45 degrees (or more, if you can) off the ground. Engage your abs the entire time and keep your hips up. Lower the extended leg back down and repeat. Do three sets of 20 leg raises. Lower your hips back down to the floor briefly. Repeat on the other leg.

High plank: Get into a push-up position and hold for one minute. Keep abs tight and body in a straight line — don’t drop or raise the hips. If you want more of an abs challenge, extend one arm and the opposite leg and continuously alternate sides.

Bicycles: Lie on your back with your legs in tabletop position and your hands behind your head, elbows wide. Straighten your right leg out to a 45-degree angle, as you lift your left shoulder off the ground and move your left elbow toward your right knee. Switch sides and continue alternating. Do three sets of 25 reps on each side.

Crunches: Lie on your back with knees bent and feet flat on the floor. Place your hands behind your head, elbows wide. Tighten your abs as you raise your head, neck and shoulders off the floor. Return back to the floor. Repeat for three sets of 25.

Donkey kicks: On all fours, extend your right foot up toward the ceiling, keeping your knee bent at 90 degrees and toes flexed. Your knee should be at hip height. Push your right foot up toward the ceiling a few inches, then lower it back down to hip height. Do 20 reps, then switch sides. Perform three sets.

 
SHARE...


3 Boxing Workouts To Make You Sweat

Boxer’s Cardio Workout


You’ll get your heart rate up for this cardio routine, designed by Piela, which also tones your entire body. Perform the combinations below for one minute each. If you’re up for the challenge, Piela suggests using light weights while you punch.


Photo: Ryan Kelly / Daily Burn 365

2-minute warm-up: 30 seconds each of jumping jacks and high knees. Repeat a second time.

Jab and cross: Alternate jabs with your left hand and crosses with your right and continuously and as fast as you can. Make sure your punches go straight out and back to your face. Engage your core and turn your shoulders and hips toward your target.

Jump rope: Do this with an actual jump rope or just mimic the movement by rotating your wrists. Jump with feet together up and down or side to side.

Jab, cross, squat: Do a jab with your left hand and a cross with your right, then perform a squat. Pause briefly between each combination.

Burpees: Jump straight up with your hands in the air. Then, put your hands on the ground and jump your feet back to a high plank position. Jump the feet back up to your hands and explode back up off the ground. (Hate burpees? Try this variation.)

Uppercuts: Perform right and left uppercuts as fast as you can. Make sure to keep turning your shoulders with each punch and engage your core the entire time.

Forearm plank: Keep your back straight and flat, and hips in line with shoulders. Position elbows directly underneath your shoulders.  

Repeat the entire sequence one more time, skipping the burpees and planks on the second round.


SHARE...


Top 3 Killer Boxing Workouts

You don’t need to start a fight to throw a few punches. Think of boxing as your go-to stress-relieving workout. You’ll not only knock out frustrations by releasing some feel-good endorphins, but you’ll also get a blend of hardcore cardio and strength training. In just 30 minutes, the fighting moves squash more than 375 calories and sculpt your back (lats, in particular), shoulders (or deltoids) and core.


Before you step into the ring, though, you’ll want to follow a few pointers on technique. Enter Rob Piela, owner of Gotham Gym in New York City and creator of Gotham G-Box (a group exercise class) in connection with WellPath. Heed Piela’s tips on how to pack a serious punch, then tackle one (or all!) of his three beginner-friendly boxing routines. Whether you want to kick up your cardio, build stronger muscles or do jab-cross combos with a buddy, there’s a plan for you.

Boxing Basics: 5 Steps to Look the Part
 

Photo: Ryan Kelly / Daily Burn 365

Step 1: Master the Boxing Stance
A. Stand with your feet a little wider than shoulder-width apart 
B. Step your left foot forward. Turn both feet 45 degrees to the right and bend knees slightly 
C. Bring your fists up to your cheekbones, keeping your elbows in by your sides. Your left shoulder should be in the front and the right shoulder behind. Get ready to punch.


Photo: Ryan Kelly / Daily Burn 365

Step 2: Practice Your Main Punch, The Jab
A. Start with the left hand. Keeping your elbow in by your side and your right fist up by your face, extend your left hand straight out in front of you. 
B. When your arm is almost fully extended, turn your wrist so your thumb faces down toward the floor. The jab should be quick. 
C. Snap your fist in and out, like a whip, with your hand coming right back to your face after you execute the punch.


Photo: Ryan Kelly / Daily Burn 365

Step 3: Put Power Behind Your Cross
A. For the right cross, starting from the bottom: Pivot your right foot so it turns inward and you’re on the ball of your foot. 
B. Your right hip and shoulder should turn forward with it, while you push your left shoulder and left hip behind you. 
C. With your left fist up by your face, move your right arm forward (keep your elbow in) and punch it straight out. 
D. Turn your wrist at the end of the punch, so your thumb faces down toward the floor. 
E. After you fully extend your right arm, snap it back to your boxing stance.


Photo: Ryan Kelly / Daily Burn 365

Step 4: Add Upper Body Oomph to Your Hook
A. For the left hook, from your boxing stance, turn to your right as you bring your left elbow up (bent 90 degrees) to about shoulder level. 
B. At the same time, your left heel pops up off the ground, as you pivot on the ball of your foot and shift your weight back onto your right leg. 
C. Bring the punch back to your face, resetting into your boxing stance.

 
Photo: Ryan Kelly / Daily Burn 365

Step 5: Attack from a Different Angle with Uppercuts
A. For the right uppercut: From your boxing stance, turn your right hip and shoulder forward. Keep your elbow in as you punch upward, thumb facing you. 
B. Bring your fist back to your face and return to your boxing stance. Bend your knees if you need to reach a lower target. 
C. For the left uppercut: Follow the same steps as the right uppercut, except this time, turn your left hip and shoulder forward and punch with your left hand, thumb facing you.


SHARE...


Friday, February 12, 2021

How to Make Money on YouTube Without a Million Subscribers

YouTube stars are today’s self-made celebrities—people who have earned an audience by creating content geared toward teaching, entertaining, reviewing, and being awesome on the internet.


Most of these small-screen celebs do what they do just to do it, to scratch an itch for creating things and being in front of an audience.

Making money might not be your reason for starting a YouTube channel, but the opportunities to earn are a pleasant surprise once you realize how many of them there are.
 
Who makes the most money on YouTube?

According to Forbes, these 10 channels were the top earners on YouTube from June 2017 to June 2018:
Ryan's World, $22 million (22.4 million subscribers)
Jake Paul, $21.5 million (19.7 million subscribers)
Dude Perfect, $20 million (47.1 million subscribers)
DanTDM, $18.5 million (22.3 million subscribers)
Jeffree Star, $18 million (16.5 million subscribers)
Markiplier, $17.5 million (24.5 million subscribers)
VanossGaming, $17 million (24.9 million subscribers)
Jacksepticeye, $16 million (23 million subscribers
PewDiePie, $15.5 million (102 million subscribers)
Logan Paul, $14.5 million (19.9 million subscribers)

This list might leave you with a lot of questions about how these YouTube stars earned their fortunes. Let’s explore some of those questions.
Do you get paid for uploading videos on YouTube?

Content creators aren’t paid by YouTube for the videos they upload. Neither are videos monetized by default. For you to start making money on YouTube, you have to enable monetization in your YouTube account settings. From there, you have options to join the YouTube Partners Program or have your videos listed on YouTube Premium.
How do you make money from YouTube?

There are a few takeaways from Forbes’ list, putting aside the millions of dollars made and subscribers gained.

First, YouTube channels can be monetized even if they don’t have millions of subscribers. Your earning potential isn’t determined solely by the number of subscribers and views you have, but also by the level of engagement you generate, the niche you cater to, and the revenue channels you explore. That’s not to say subscriber count doesn’t matter 

Second, this list of top 10 earners might give you the impression that the millions of dollars made comes directly from YouTube. In fact, each of these channels has its own line of merchandise. These channels found and built their audiences first, before launching their own merchandise. If making money on YouTube is in your marketing plan, the first step is the same for everybody: have a clear understanding of your target audience.


Video marketing is a powerful tool you can’t afford to ignore. Get a crash course with our free, curated list of high-impact articles.Get the free reading list
Who’s going to watch your YouTube channel?

Building your own audience puts you in a great position to monetize content in a variety of ways. But you’ll only be able to take full advantage of the opportunities you have if you understand the makeup of your audience.

For many YouTubers looking to monetize, the more niche your channel, the better position you’ll be in to work with brands looking to target specific audiences (more on that later).


You'll want to pay close attention to:
The gender of your audience, to see if its skews toward one particular group.
The age range most of your audience falls into.
The geographic location—countries or cities—where your videos are being watched.
Your audience’s overall engagement, or “watch time.”

With this demographic information at hand, you’ll have a better understanding of your own audience and be able to work better with brands. All demographic insight can be pulled from your YouTube analytics, but to compare your own channel against others try a tool like Social Blade.

With that out of the way, we can start talking about the different ways your YouTube channel can make money.

How to make money on YouTube

Like learning how to make money on Instagram or via blogging, your audience might unlock your YouTube channel’s earning potential. But when you create multiple revenue streams, through side side hustles or businesses, it's easier to monetize.

Luckily, there are several ways to accomplish this—let's take a deeper look at each of these streams.
Become a YouTube Partner and earn money from ads.
Sell products or merchandise.
Crowdfund your next creative project.
Let your audience support your work through “fan funding.”
License your content to the media.
Work with brands as an influencer or affiliate.

On this episode of Shopify Masters, co-founders Patrick and Lewis from Patrick Adair Designs share the exact strategy they used to create and promote a YouTube video that earned a million views. Press play to hear their story and subscribe for weekly episodes.


1. Join the YouTube Partner Program and earn money from ads

The first revenue stream you’ll likely explore is ads. Whether you want to earn money on YouTube without creating videos or as a content creator, joining the YouTube Partners Program and setting up monetization is a vital step. You can apply for monetization once you’ve hit 1,000 subscribers and 4,000 watch hours over the past year.
How to enable monetization on YouTube
Sign in to the YouTube account you want to monetize.
Click the icon for your account in the top right corner.
Click YouTube Studio.
In the left menu, select Other Features > Monetization.
Read and agree to the YouTuber Partner Program terms.
Create a new AdSense account or connect an existing one to your channel. (You need an AdSense account to get paid.)
Set your monetization preferences.

Once that’s done, head back to the dashboard and click the Analytics tab on the left side. From there, you’ll need to choose Revenue from the tabs at the top, then scroll down to the chart Monthly Estimated Revenue to get an idea of your predicted revenue.
How many views do you need to make money?

The number of views you get doesn’t correlate to revenue earned. If your video gets thousands of views but no one watches or clicks the ad, you won’t make any money. This is because of YouTube’s criteria for billing advertisers: a viewer must click an ad or watch the ad in full (10, 15, or 30 seconds) for you to get paid.

However, with the release of YouTube Premium, you no longer need to rely on advertisers to create engaging or enticing ads to earn revenue.
Check out YouTube Premium

YouTube Premium is a paid membership program that allows fans to watch and support their favorite content creators without ads. For creators, not much changes, as they will get paid for content consumed by non-members on YouTube along with content on YouTube Premium.

Creators are paid for YouTube Premium based on how much members watch their content. Consider revenue earned from YouTube Premium as a secondary revenue stream in addition to what you’re already earning through ads.

While it’s easy to set up, earning money through advertising as a YouTube Partner is far from the most lucrative revenue stream you can create for yourself.
Why you should look beyond ads for revenue

YouTube recently received a lot of backlash due to its decision to be more transparent about advertising on the platform and what qualifies as “advertiser friendly” content. Essentially, many creators feared that, due to the nature of their content, they would lose out on the ad revenue that helps support their channel.

According to YouTube, your content could get excluded from ad revenue if it includes:
Sexually suggestive content, including partial nudity and sexual humor
Violence, including displays of serious injury and events related to violent extremism
Inappropriate language, including harassment, profanity, and vulgar language
Promotion of drugs and regulated substances, including selling, use, and abuse of such items
Controversial or sensitive subjects and events, including subjects related to war, political conflicts, natural disasters, and tragedies, even if graphic imagery is not shown

But the reality is that YouTube has been demonetizing content that it doesn’t deem advertiser-friendly since 2012 via an automated process, without warning and without the content creator’s knowledge.

Now, the situation is actually better, as creators are notified when their content is flagged and can contest any time they feel a video was mistakenly excluded from YouTube’s advertising network.

Advertising might be a common means of generating passive income for creators, but the trade-off is that YouTube gets to keep around a 45% share of ad revenue.

In short, YouTubers should explore other revenue streams to sustain their creative hobby.

Below, we’ll share how to earn money from YouTube without AdSense.

2. Sell products or merchandise

There are plenty of products to sell that can help you make money through your YouTube channel. Selling merchandise—t-shirts, coffee mugs, tote bags, snapbacks, you name it—has a benefit beyond revenue.

Merchandise increases your exposure by putting your online brand and personality out into the offline world and deepens the relationship between you and your fans as they literally “buy” into what you're doing.


Roman Atwood sells a variety of merchandise in his store under his Smile More brand.

Selling branded swag is easier than it might seem at first.

You can order affordable designs tailored for specific products, like t-shirts, using freelance sites such as Fiverr.

And when it comes to handling orders, you can integrate your store with services such as Oberlo or one of the many print-on-demand providers that take care of shipping, fulfillment, and customer support, letting you reap all of the benefits of a dropshipping business that demands less effort on your part.

How to Quickly Start a T-Shirt Store

Learn how to sell t-shirts without worrying about design, inventory or shipping.

Alternatively, you can partner with an existing merchandising network for creators, such as DFTBA (Don’t Forget to Be Awesome). However, you’ll be competing with other YouTubers and have less control over adding products, offering discounts, integrating your content, and all the advantages that come with owning your own ecommerce site.

You can even go a step further by manufacturing and selling your own unique products and powering your business through your YouTube channel, like Luxy Hair did to sell its hair extensions with hair-related how-to video tutorials.

As a YouTuber who’s already earned an audience, you’ll have two advantages from the start that other store owners would be jealous of:
A content engine that consistently drives traffic to your store.
Your audience's trust, which you've earned by regularly serving them your own brand of content for free.

3. Crowdfund your next creative project

When money is all that stands between an idea and its execution, crowdfunding is a good way to make it happen.

Whether you need help buying better equipment, hiring actors, or covering other production costs, you can call upon your own audience and the crowdfunding community to pitch in if your idea is compelling enough.

Many successful crowdfunded creative projects tend to offer a sneak peak or “trailer” that gets people excited, so consider shooting a video explaining your project or offering a taste of what it'll be like, such as this popular Kickstarter for Kung Fury, a short film paying homage to ’80s action movies.


Popular crowdfunding sites with a proven track record of campaigns from YouTubers include:
Kickstarter: One of the most well-known crowdfunding sites, great for funding cool products and creative projects. Be sure to set an attainable funding goal because you’ll only secure it if you actually meet the goal you set.
Indiegogo: A Kickstarter alternative that offers more flexible funding options.

 4. Let your audience support your work through “fan funding”

Similar to crowdfunding a project, you can also set up “fan funding” streams to source donations from your audience.

As a creator, you’re contributing your voice to the internet without forcing your audience to pay for admission. So, if you’re offering good content, your audience might be inclined to support you on an ongoing basis.

Many fan funding platforms offer creators another place for people to discover their content and a way to engage their most loyal audience and reward them for their support.
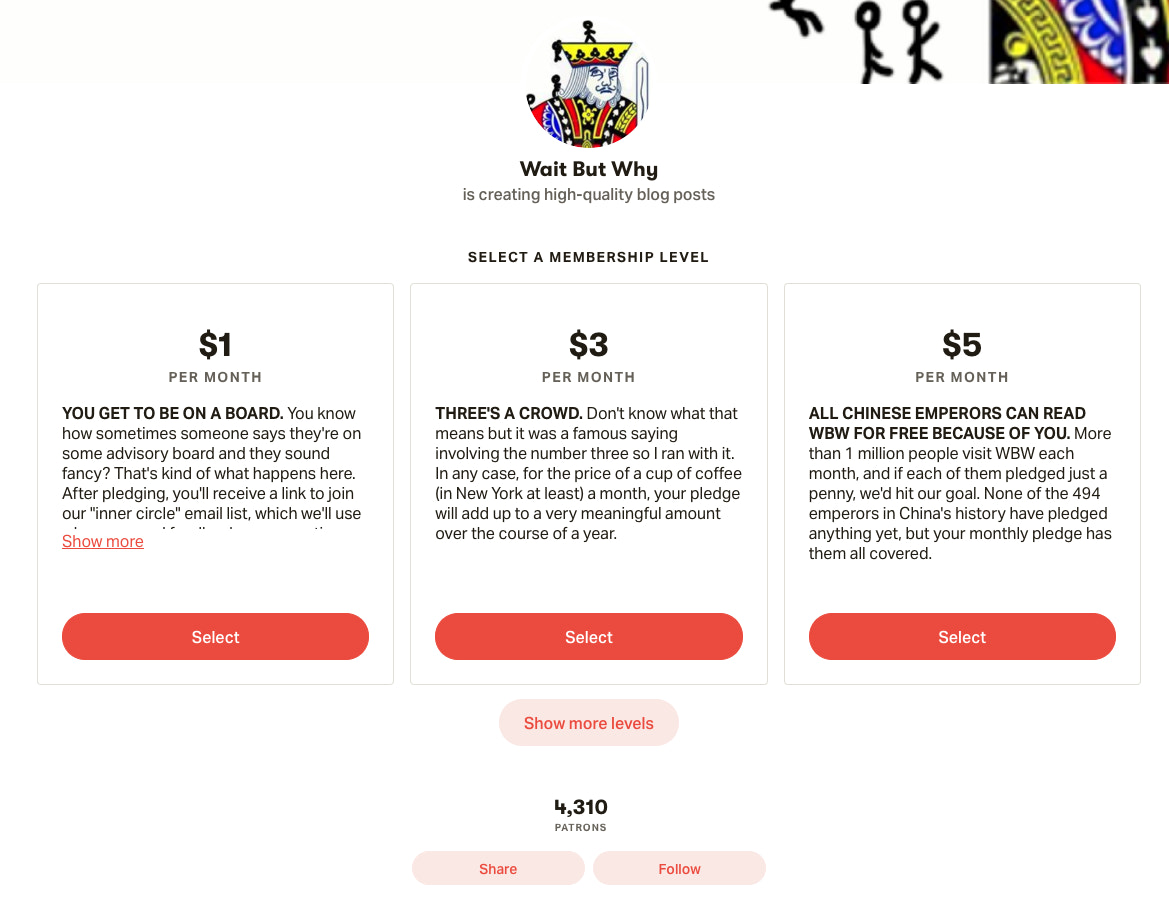


Wait But Why creates more long-form written content than YouTube videos, but is a great example of receiving support from the Patreon community.

If you choose the crowdfunding route, be sure to follow a couple of best practices. First, create transparency around how the money will be spent. This will get your fanbase invested in your story or mission, and they will literally buy into the value of your content. Second, offer enticing rewards for better pledges. The more you can make donors feel like they’re getting something exclusive for being a loyal fan, the more likely you are to get donations and higher pledges.

Some popular fan funding options include:

YouTube’s Super Chat: Super Chat is a feature used when going live on YouTube. It lets you create a tipping jar for your viewers to donate whenever and however much they feel like contributing. You’ll need to set up your YouTube account for advertising as outlined above.
Patreon: The membership platform that makes it easy for creators to get paid. Fans can subscribe to their favorite creators for as little as a dollar a month and receive exclusive rewards.
Tipeee: Lets you get a combination of both one-off and recurring donations

5. License your content to the media

If you happen to create a viral video with mass appeal—say, a funny clip featuring your dog—you can license your content in exchange for money.

TV news outlets, morning shows, online news sites, and other creators might reach out about rights to use your videos if they happen to go viral.

You can also list your videos in a marketplace, such as Juken Media, where your content will be easier for the right people to find and purchase.


When this video of a woman wearing a Chewbacca mask went viral, tons of media outlets wanted in.
 
6. Work with brands as an influencer or affiliate

Influencer marketing is going to be one of the advertising bedrocks of the next decade.Gary Vaynerchuk

Brands are investing more and more in influencer marketing, spending their typically large advertising budgets on influencers who’ve already won the loyalty of their audiences.

This creates a massive opportunity for you as a creator if you can negotiate the right deals.

Brendan Gahan, a YouTube marketing expert and influencer, recommends establishing your baseline flat fee by looking at the number of views your videos typically get and multiplying it by 5 to fifteen cents per view (which is around what many brands are willing to pay for views via YouTube ads).

Depending on your leverage—your audience demographics, content quality, and how unique and profitable your niche is—you might be able to negotiate a better deal if the brand is a good fit.

Becoming an influencer on YouTube is reported as the highest-paid platform for brand partnerships, according to Aqer. But to give you an idea of what you can potentially charge, a mid-level influencer charges a brand around $20 per 1,000 subscribers, or $2,000 per $100,000 followers, according to one study.

The key when partnering on brand-sponsored content is to be transparent about it, not endorsing anything you don’t actually like or believe in, and being upfront with your audience about why you’re doing it.

Here are just a handful of the many influencer marketplaces you can add your channel to and get discovered by brands both big and small:
Grapevine Logic: One of the more popular influencer marketplaces, you only need 1,000 followers to join.
Famebit: With a wide range of brands to work with, you might find a sponsorship opportunity you’ll be proud to be a part of. You need 5,000 followers to join.
Channel Pages: Partner with other YouTubers as well as brands.
Crowdtap: Complete small content creation “tasks” in exchange for money and other rewards. There’s no restriction on how many followers you need to join.

Some influencer marketplaces offer you free products, while others are known for having big brands who are willing to pay more. Capitalize on the opportunities that best suit your needs, but list yourself in as many places as you can to ensure maximum visibility for your channel.

Alternatively, you can also become an affiliate marketer for brands and make residual passive income through commissions from every sale you generate through your channel. This works especially well if you review products as part of your YouTube channel. Since there's no risk involved on the brand’s end (they only pay when they make sales), there's usually a low bar to getting started.

Popular affiliate programs include Click Bank(1% to 75% commission, depending on what the vendor sets) and Amazon's Affiliate network (earn up to 10% per sale). You can also reach out to brands in your niche that are running their own affiliate programs, which isn’t uncommon in the ecommerce space.
How to “sell” without annoying your audience

Many of the above strategies for monetizing involve promoting products or campaigns (e.g., crowdfunding a video series). But you’ll want to make sure your promotions don’t sabotage the integrity of your content.

“Selling out” is a real concern for a lot of creators. But if you never ask, you’ll never get.

There are a number of “placements” you can choose from for promoting products or campaigns.
Record a call to action in your videos

“If you liked this video, then hit the Like button and subscribe.”

Many YouTubers include a call to action along those lines at the end of their videos to grow their viewership. By suggesting the intended action you want them to take, your audience is more likely to take it.

You can adapt this approach to direct your audience’s attention to a revenue-generating opportunity.
Add well-timed YouTube cards to your videos

Whether it’s part of your deal with a brand or you’re promoting your own products, YouTube Cards offer an eye-catching way to get the attention of engaged viewers.

You can set them to pop up at just the right moment, when they’re most relevant and least distracting to increase their impact.


Add links in your video descriptions

You can funnel viewers to your store, Patreon page, Kickstarter campaign, or other revenue-focused part of your online presence by adding links to your video descriptions.


If you’re a video creator who wants to focus on generating revenue as an affiliate marketer, look at Unbox Therapy. Unbox Therapy specializes in product reviews, and it uses affiliate links in their video descriptions to make money via YouTube audiences. The channel is signed up as an Amazon affiliate. It places these unique links—pointing to the reviewed product on Amazon—in video descriptions. If the viewer purchases the item via clicking that link, the affiliate will earn a small percentage of revenue share paid to them by Amazon.

If you’re creating videos about your own products and you own or manage a Shopify store, you can incentivize new customers to buy your products with buy X get Y promotions or discounts.
Promote your offer on other platforms

Just because your content is hosted on YouTube doesn’t mean you shouldn’t be taking advantage of all the other distribution channels out there.

Spread the word about new campaigns or discounts on Twitter, Facebook, and any other profiles you own.

The more places your message lives, the greater the chance it’ll be seen. So it’s always a good idea to grow your following beyond YouTube with social media marketing.


Want to learn more about how social media can help drive sales? Download our free, curated list of high-impact articles.Get the free reading list

Are you ready to monetize your YouTube channel?

What compels most creators to create is rarely money. It’s the thought of making something for the world to enjoy.

But ironically, that puts them in a great position to actually make money in a content-obsessed world.

While the hard part for many businesses is getting and keeping their audience’s attention, YouTubers have already figured that bit out.

All that’s left is to get creative—to channel the entrepreneurial drive to explore ideas—with how you choose to monetize your passion.

Illustration by George Wylesol


Follow:


Blog site - https://havefunkeepfit.blogspot.com/

Soundcloud - @incaseyoumissed
Reddit - www.reddit.com/user/InCaseYouMissedRedd
Tumblr - cyberchaosland.tumblr.com/
Pinterest - www.pinterest.com/InCaseYouMissedPin/boards/
Facebook - https://www.facebook.com/HaveFunKeepFit/
Twitter - twitter.com/incaseumissedph
Instagram -  https://www.instagram.com/havefunkeepfit/
ClickDJ - click.dj/l/JPwo

 YouTube - https://youtube.com/c/HaveFunKeepFit


Tell me what you think


In the comments below let me know what you think about on the list. Do you like them, do you hate them? Or even better, are there any other you believe would do a much better job?


Show your support 


If you have enjoyed the videos or if it was interesting and helpful in any way please subscribe, drop a like, comment and a share! It really means a lot and helps the blog grow and show your support